 |
1 |
 |
1 |
The Auto-Complete feature for WebForms provides a fast and efficient method for completing EDI documents. Combined with the use of WebForms defaults, the Auto-Complete feature can save time and reduce data entry errors. Refer to the Setting Defaults section for additional details on working with defaults.
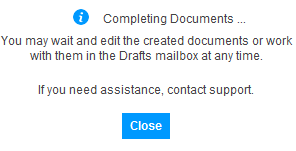
The user must first establish default data for a document type in order to use the Auto-Complete option. Once defaults have been established, and after specifying a source (i.e. purchase order, etc.) and return document type (i.e. invoice or purchase order acknowledgement), the user then selects Auto-Complete. The WebForms application generates a return document and then validates it against your trading partner's EDI specifications. If the EDI specifications are incomplete or if additional fields are required, such as the invoice number or invoice date, the user may wait to complete data entry through the Quick Edit window or edit the draft saved in the Drafts folder.
The Auto-Complete feature can be used for all return documents - invoices, purchase order acknowledgements, and ASNs - but some uses are better than others. The following are some important considerations for using the Auto-Complete feature:
Be sure that your return document does not require any changes to information such as quantities or price.
Using this feature for creating an ASN can pack your cartons in one of two manners based on your default settings. If you select items per carton as single in the Defaults, Auto-Complete will create a pack for each line item. If multiple items per carton is the default, all line items will be put in the same pack.
This feature can also be used to complete Draft documents. In many cases, you may choose to save a draft of a return document and submit it at a later time. Instead of opening the draft and selecting the Submit option of the form, you can simply select the draft(s) to be submitted and then select the Auto-Complete feature. If there are additional fields required, such as the bill of lading number or invoice number, you can enter those fields using the Quick Edit window.
The Quick Edit window allows the user to enter up to ten (10) fields. In cases where there are more than ten (10) fields that the user must enter, a draft of the return document is saved in the Drafts folder and a message indicating that the Auto-Complete feature did not complete successfully is displayed. If this occurs, you can complete the document by opening the draft, selecting the Check option to determine which fields are required, entering the data, and submitting the document.
Using the Defaults feature can optimize the Auto-Complete feature. Setting defaults for fields such as the Ship From Address and Payment Terms will reduce the number of fields that need to be completed using the Quick Edit window.
Auto-Complete can be accessed through Aggregation or the Next Steps menu. No matter which way you access this feature, the steps are the same.
View this training video for instructions on how to use the Auto-Complete feature.
Select the source document(s).
Select the auto complete option.
Select the return document type - PO acknowledgement, invoice, etc.
Enter any missing data using the Quick Edit window, if available, or by editing the draft generated and sent to your Drafts folder.
Check and save or send the document(s).
When accessing the feature through Next Steps or select Auto-Complete (One-Per-Source), each source document selected will complete one turn-around document. Selecting this feature from the New Documents menu will create one return document for all source documents selected.
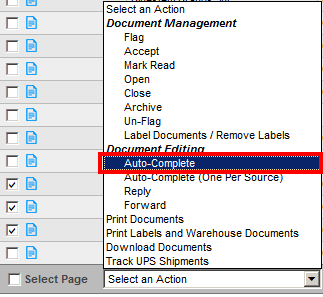
When in the Inbox, place a check mark in the box in the Status column for the document that you want to work with.
Select Auto-Complete from the Select an Action pick-list in the lower-left of the window (below the Status column). Learn more about the Select an Action menu in this training video.

The Select a Form to Create window displays. Select a return document type. Auto-Complete will begin to create the return documents.

Auto-Complete will begin to create the return documents.

The Quick Edit window displays. Enter data using the Quick Edit window.