|
1 |
|
1 |
All incoming
documents are stored in the Inbox.
Unread documents are displayed in bold. Documents that have been viewed
are displayed in a non-bold font. Documents displaying the ![]() icon are unread. Documents
displaying the
icon are unread. Documents
displaying the ![]() icon have been viewed.
icon have been viewed.
Please watch the WebForms Navigation and Features training video for additional training.
The Inbox is organized into rows and columns. Rows include individual document records. Columns provide document information. Use the arrows to sort by column. See Sorting for more details.
![]()
NOTE: To view or hide columns, see Preferences.
Search
by Document ID type in
a document ID to search for a specific document. Click the  magnifying glass or
hit the Enter key to perform the
search.
magnifying glass or
hit the Enter key to perform the
search.
Definitions:
Status - Indicates the place of
the document within the work cycle, such as Read,
Unread, or Errored;
sort
arrows ![]() allow for viewing documents by Status
allow for viewing documents by Status
Sender - The name of the trading
partner that has sent the document; sort arrows ![]() allow for viewing documents by trading partner
allow for viewing documents by trading partner
Type - Indicates the kind of document that is being viewed, such as purchase order or product forecast
ID - A unique number that has been
assigned to the document; sort arrows ![]() allow for viewing
documents by ID number
allow for viewing
documents by ID number
NOTE: Should your trading partner use additional identification information that cannot be entirely displayed, such as a release number, that additional identification information can be displayed by using the mouse to "hover over" a particular ID. Should additional identification information be present, a small dialogue display window will appear as long as your cursor is over it.
Label - A user-created label used to identify or mark documents. See Labeling Documents for more details.
Date - Date and timestamp of when the document posted to your site; sort arrows allow for viewing documents by date
Next Steps - Allows for viewing a list of return documents to be completed for that particular document and trading partner
Use the toolbar at the bottom of the window to perform the following actions:
![]() Print
the selected document(s)
Print
the selected document(s)
 Print labels and warehouse documents
 Flag the selected document(s)
 Archive the selected document(s)
![]() Accept a PO Change
Accept a PO Change
 Mark the selected document(s) as read

Click on either the ![]() icon
or
icon
or ![]() icon under the Status
column and the correlating document from that row will open in a secondary
window.
icon under the Status
column and the correlating document from that row will open in a secondary
window.
or
In the Sender column, click on the trading partner name for the document that you want to open. The correlating document from that row will open in a secondary window.
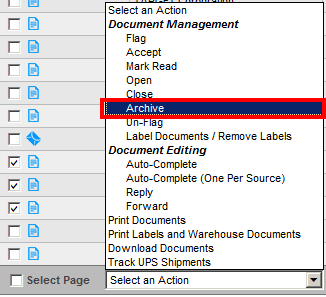
To Perform an Action on Multiple Documents at One Time
Place a check mark in the box in the Status column of the document(s) that you want to view.
Choose an option from the Select an Action pick-list in the lower-left of the window (below the Status column). Learn more about the Select an Action menu in this training video.
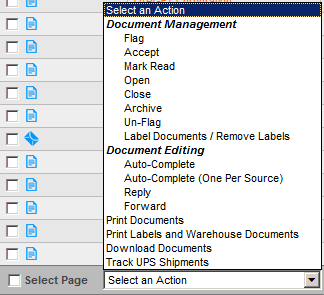
NOTE: To use the Select an Action menu on multiple documents, each document must be on the same screen. Please see the Documents Per Page or the Search sections of this manual for more information on how to have all desired documents on the same screen.
Archiving documents removes them from your inbox.
Learn how to archive a document by viewing this training video.
Select the document(s) you wish to archive.
Click
the Archive button on the bottom tool
bar.

You may also use the Select an Action drop-down menu and click Archive.